All Natural Christmas Decor

Christmas is one of the happiest occasions we celebrate every year and there are countless Christmas decorations and ideas presented by interior stylists and bloggers .
One thing is certain: it takes a lot of space, it's expensive and wasteful to get new trending decorations each year.
Following the Zero Waste idea, we prepared a few tips on decorating your Christmas tree in a natural, eco-friendly way, with ornaments that are made from natural, reused or renewable materials, suitable for composting, take less energy and materials to make, support local craftsmen and small businesses and are made to last.
And most important of all it will give your home a beautiful natural look and a festive feel.

Here are ornaments made from the most common natural, renewable, zero waste materials.

WOOD
Renewable, compostable material, that fills your home with warmth and woody scent and gives it an instant rustic look. Keep an eye out for toxic paint or glue.
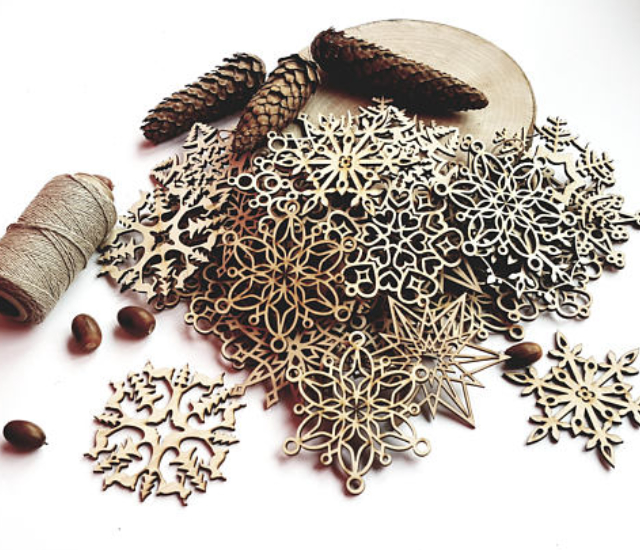
Set of Natural Wood Ornaments by MadeWithLoveByAleksi
Set of three Rustic Star Ornaments, natural and eco-friendly, made from fir bark from coastal forest by kaleda
WOOL / FELT
Wool and felt traditionally associate with winter time, crackling wood in the fire place, cozy and warm evenings. Although it's non vegan, but is another popular craft material, that can be recycled or composted. Be careful, some felt ornaments might be stuffed with polyester filling.
Real Oak Acorn Cap and hand felted Ball Ornaments. Comes packed in a craft box from VART
Perfect Christmas tree decoration for rustic or country holidays. Made by mellsva
JurgitaNeedleFelting made this quaint Red Bolete Ornament , it just breathes vintage feel.
Four Little Red Gnomes will cheer up every child and grown up. Gnomes are made of felted wool balls, felt and hand embroidered with beads by JoyfulRiver
LINEN/COTTON/CERAMIC
Linen ornaments give more vintage country feel, usually come in calm earthy tones and is easy to match within most interiors.  Linen is also eco-friendly material.
Cotton is the most versatile fabric, ornaments can be sewn, knitted, crocheted or knotted, it only depends on creativity and time.
Ceramic ones are pricier, but sturdy and will last longer, not so Zero Waste, due to energy required to make, so choose carefully, go for quality, check local the ceramic artists, visit the workshops with the family to make unique and personal ones. Ceramic ornaments are a great family keepsake for passing down to kids.
Christmas Cloth Linen Angel Ornament from DovileDollart
Six White Unique Snowflakes from SnowflakesStories
Christmas Tree Heart Ornament. Handmade, packed in the box with some wood shavings by CozyHomeIdeas
MOST NATURAL MATERIAL COMES FROM NATURE
Acorns, pine cones, conifer cones, decorative twigs, dried berries, nutshells, evergreens go well as ornaments, centrepiece, presented in bowls or baskets.
All you need to do, is just have a nice afternoon in the local park or forest.
Classic and elegant Wreath from SecretGardenn. Made from paper, jute rope and pine cones.
Eco friendly Handmade Soy Wax Candles in Walnut Shell. Amazing idea by LessCandles
When choosing an ornament for your Christmas tree follow a few simple tips:
* Go for color range that compliments your home. Neutral colors, earth, black, coffee, gold, silver always look good with any decorating style.
*Play with size and shape of spheres, combine stars, snowflakes, reindeer figurines, saints, angels. Mix and match different materials and textures.
*Decorate Your Christmas tree with white lights, they will always look good and can be used season after season without worrying, that it will not match colors of that year.

PINE CONE GARLAND TUTORIAL 
Materials:
Pine Cones
Cotton String/Jute Rope
Wrap the thin rope inside the scales of each pine cone
Leave approximately 10cm of rope between each cone.
Make simple loop-knot at the end and trim excess rope.
Hang up and enjoy !

Mohair... Always and forever?


Mohair is one of the oldest and most expensive textile fibres, produced exclusively in Turkey for thousands of years and achieving importance in European textile manufacture during the 19th century.
All the time it was a luxury attribute, nowadays it's more accessible in different sizes and shapes as plaids, dresses, accessories, toys etc. 

The mohair slouch hat could be your perfect accessory this autumn - winter time. MalramBoutique sells this cozy hat.


SweetDreamsProps presents wonderful soft mohair bears. For me as an adult they are really appealing, would love one next to my bed. 


This adorable mohair cowl from RDesignStore will protect you from cold as well serve as an exclusive accessory.


Mohair for our little ones, what can be more fun than soft and cozy mohair fibre?.. Wonderful dress for little princess from Ramuneart must stay the most important thing in small girl festivity.


Or this newborn romper from mohair for the little ones... Found in NeringaWorkshop


Do you already want mohair?.. yes, me too :)

Personal wool OOAK dolls by SmallMiraclesDolls

 This time we introducing a wonderful baby dolls author SmallMiraclesDolls.
Here is her story and shop link.

Perfectly handmade - Personal OOAK dolls, Warming microwavable baby toys, New baby gifts
 
Meet the dolls that are born from dreams and create small miracles in people’s hearts. Each doll as unique as the person it’s being made for himself. 100% handmade, stuffed with warmth, love and care, good thoughts and wishes.
 The main idea for WARMING GNOMES is soft handmade dolls stuffed with wool, with a small bag of salt or buckwheat inside. All you have to do is to warm the bag in the oven or microwave and put it back to the dolls belly. The wool takes the warmth of the bag and the toy stays warm longer, giving your child a snuggy hug and thermal healing.
Each toy lives in his own bag, containing short instructions of using. It’s a perfect gift visiting a newborn!
You can choose one of many available colours and combinations, suitable for a girl, a boy or a baby-surprise. :)
 I also love making OOAK (one-of-a-kind) DOLLS, it's my real passion, which brings a lot of joy and also challenge each time I start a new project.
Why are they so special? They have a little heart inside their chest, something intended for that specific doll and the person it’s being made for. It can be something I feel is needed or anything you bring a meaning – amber, sea stone with a hole, shell, ring, cross… It also has a little note with written wishes or traits for that someone special. Each doll has its own energy and also its own special heart with wishes from me and you.
The doll can be anything you want to. As a boy, it also has something only the boys have – otherwise how would you know it’s a boy? 😉 A child can undress the doll completely, the clothes are removable, so you can wash them or sew something yourself. It’s also useful for the children to train undressing the dolls and fastening the buttons.
The hair is easy to brush, band and braid without any fear it gets damaged. The doll is soft, warm and cosy. The arms and legs move and bend. Size approx. 35 cm (13.8 in), weight 200 g (0.44 lb).
The dolls are made mainly FOR CHILDREN. They are completely safe, suitable for hugging, playing, loving, snuggling. 
For more information, visit my site.


Beaded leather bracelets, Men's leather bracelets by Kutadesign

If you like minimalist style, you are in the right jewelry box. Visit Kutadesign SHOP
And here Laura's about story.

Laura, designer from Lithuania. I was graphic designer for more than ten years. As a woman I naturally was interested in fashion, wanted to dress and to wear something special. That was a problem because it was hard to find clothes or jewelry what I had in my mind. From my early years I tried to solve such "problems" by making clothes myself.
KUTA story began, when my fiancé proposed to find a hobby, because everybody should have it. Somehow I had forgotten to have such thing. I found it in no time – “designing and making jewelry” I thought will be it. Of course in the beginning all models were for me and only me until I posted one model on Facebook. Many likes and interested people encouraged me to make jewelry not only for me and friends but also to offer for broader audience.
Years passed, my hobby became my work and work became a hobby. And I am very glad for that, because as a graphic designer I always valued work which involved creativity. Till 2016 bracelets were worn by Lithuanian women, now it's time to show bracelets to the rest of the world :) I registered in 2015, but only from 2016 trying to put my works here and trying to find how things works on ETSY :) Hope I will find many jewelry lowers here! 
If you are interested in minimalist, classic, modern jewelry design and you found something what you like, fell free to look in my shop and imagine it as your own jewelry box.

With personal attitude just for You,
KUTA

Wood home decor by Holeybox

HOLEYBOX SHOP is the shop for people who are looking for something interesting and modern. Step right up and meet our divers team of creators. All of us in they respective area of trade- the people who make the unique and the exclusive happen on a daily basis.
 The idea of the shop is to charm the people with unique, one-of-a-kind, limited- edition, and hand-crafted products.
All of our products are made with the utmost care and love.
Materials- different Lithuanian wood (oak, pine, birch, asp, ash...)
 Have any offers, wishes, or simply cannot find what are you looking for? No problem! Send us a letter and we will try to help you with that. 

DIY: Artist Teddy bear Hedgehog Free Step by step TUTORIAL by SoftlyBearPaw

This is my Teddy bear Hedgehog free tutorial which I would like to share with you. Teddy Hedgehog is 19cm tall while standing.
Happy sewing my friends ;) 
 
Material list

Hedgehog mohair 9mm pile – 20x20cm
Brown viscose 6mm pile – 25x22cm
Little piece of suedine for ears
6mm black glass eyes
6 x 15mm wooden discs for head and arms
4 x 20mm wooden discs for legs
10 x 12mm washers
5 T-shape cotter pins
Fiber fill for stuffing
Steel pellets for legs and tummy
Strong thread for sewing
Very strong eye yarn
Nose thread


Sewing Supplies
Little sharp scissors, Awl, Pins and needles, Cotter key and long nose pliers, Wooden stuffer, Fray stop, Oil paint and paintbrush for shading.

Bear Pattern
First of all you will need to transfer the pattern on heavy paper, and cut out all the details.  Mark all the signs that are shown on the pattern.
The arrow indicates the direction of the hair. The big dot shows the place where you will need to make a hole for joints. You also see a marked places where you must leave open place. Just make sure than you made a good knots in the end of seams and stain the open place with stir fray glue.
 
Transfer them to the wrong side of the fabric. It is most convenient to make it with a ballpoint pen. On light color fabrics I just use a pencil. Mark out all the pairs of items in mirror image. All my patterns are with 3mm seam allowance so you don’t need to add more. When working with patterns, pay special attention to all the marks! Transfer them all on the fabric.
Once the pieces all fit correctly onto the fabric then cut them out using a sharp scissors. I use embroidery scissors for cutting the pile. When cutting out fur (especially those with longer pile) insert the scissors under the fur when you cut.

Head
Start with the head and muzzle pieces. Place these pieces together with the furs together (inside out) and pin them. (You can never use too many pins!)When pieces are pined then sew them. Use back stitch to sew the pieces together. All seams are 3mm. 

After this you will have two head pieces. Now sew the arrow on each of the peace. After you have two finished peaces place them together with the furs together (inside out) and pin all around and sew. Don’t forget to leave hole for head joint.
Apply fray stop to the open area to prevent fraying during the stuffing.
Turn the hedgehog head to the right side out.  Stuff the head starting at the nose with small pieces of stuffing at a time. Use wooden stuffer.
Eyes
Place pins in the position you would like your eyes to be to test where the eyes should be inserted. Cut a long piece of eye thread. Pick one of the lengths, and thread both ends through the long doll needle, leaving a loop at the end. Insert the needle in the place where the ears should be, coming out through the hole of the opposite socket where the eye pin is inserted.  

mportant Note: leave thread loop hanging out of the ear – DO NOT PULL ALL THE WAY THROUGH.
Thread the needle through the wire loop of the eye and insert the needle back in the same hole. Come out almost next to where you started.
Wrap the needle 3 times through the synthetic sinew loop you’ve left behind and pull hard.
Insert needle next to where you first started and exit anywhere on the head.

Nose and mouth
Select a nose shape. Mark the shape onto the nose area and embroider it on using a satin stitch. Stitch the mouth on in the shape you desire.

Body
Sew the back part of the body piece and the front part of the body piece together to form the two sides of the body.
Place the two body pieces together and sew around, leaving the back open as indicated on the pattern.
Apply fray stop to the opening in the back to prevent fraying during stuffing.
Turn your body the right side out.

Arms and Legs
As my hedgehog pattern arms are without paws. Just put the arms pieces rights sides together and sew around the edges leaving and open space as shown in the pattern. And repeat this with the legs. Apply fray stop to the opening to prevent fraying during stuffing.

Ears
Sew around the ears leaving an open space where indicated on the pattern. Turn the right way around. Sew the ear closed using a ladder stitch. Pin the ears in place. Attach to the head using a ladder stitch.

Jointing the limbs
Thread a washer and a disc onto a cotter pin. Put the cotter pin/washer/disc set into the hole (use an awl to make a hole) in your limb and push the cotter pin through the marked joint hole and then into the corresponding hole in the body. Add the disc and another washer and with the help of a long nose pliers or a cotter pin turner, turn each cotter pin's leg away from each other and tighten it very well. Perform the steps for the other limbs.

Jointing the head
Thread a washer and a disc onto a cotter pin. Put the cotter pin/washer/disc set into the hole in hedgehogs head. Use a leader stitch to close the head hole.
Push the cotter pin through the chosen joint hole in the body. Add the disc and another washer and with the help of a long nose pliers or a cotter pin turner, turn each cotter pin's leg away from each other and tighten it very well.
 Stuffing
Use small pieces of fiber fill stuffing and stuff the arm from the paw pad first. Stuff firmly and fill it well. Use a stuffing tool to do so. Turn the raw edges of your opening inwards and ladder stitch the hole closed. Each stitch should be pulled tightly and the seam will close. Tie off with a knot and cut the thread. Do not over stuff the area where the ladder stitching will be sewn as this is a stressed area and stitches may not pull correctly together. Don’t forget to add steel pellets in to the feet about one tea spoon. And then stuff the legs in the same manner as the arms (mentioned above). Instead of making toes on arms and legs I just use nose thread and simple stitch to mark the nails.

Stuffing the body
Using small bits of stuffing at a time, stuff the body firmly. Don’t forget to add steel pellets at first. Make sure that the bum and tummy are stuffed well. Turn in the raw edges at the opening on the back and ladder stitch it closed.

Shading
Carefully shade the nail lines and tummy, areas above eyes and around the muzzle with a dark brown oil paint.
Extract small amount of paint on some paper and leave an hour to drain off the oil. Then soak brush in to the paint swept it into piece of some material and line material until you see the brush dye very pale then start to tone bear. But I recommend trying it on the peace of fur at first.

Accessories

The accessories are of your choice J I like to use natural silk ribbon dyed with silk paint in the color I want.

I hope you like this tutorial and Have a very fun time making your own Hedgehog...
You can find more Teddy bear PDF patterns in my SHOP

Best wishes, Simona

Handmade accessories, sweaters, cowls by IvetaStasiulioniene

Welcome to IvetaStasiulioniene SHOP and here is her story...

I finished history and art history bachelor studies in one of the oldest universities in Europe, Vilnius University.
But after becoming a mother, I fully indulged to my family. Having free time I always sat down to knit, and little by little it became a full-time job.

I have loads of ideas, that I try to recreate, old knitting techniques and new fashion trends combining all into one. I want to try everything. From wedding and boho knittings - to warm and fluffy winter accessories.
 I am really demanding towards myself and my knitting. I choose only the highest quality yarn. I thoroughly inspect them to see if they are soft, if they will itchy and if they will stretch and bleed during washing. It`s really important to me.

 I try to improve a model as much as I can, until I feel delighted with the turn out and fall in love with it myself. Only then I show them to You.
Before shipping all of my knittings out, I wash them with an eco detergent. You get clean, fragrant knittings and You can easily wear them on the same day you get it!

I am delighted when the clients are happy with my products, a part of my heart belongs to them:)

Teikia „Blogger“.

Popular Posts

Like us on Facebook

Follow Us on Instagram