Handmade albums, guest-books, folios, boxes, cases by ShoopDeko

ShoopDeko are making adorable DVD boxes and cases for USB flashes. Just perfect handmade items. Please visit the SHOP.
Our artisans - a bunch of dreamers united by our mutual love for handcrafts and photography. That is why we are always seeking products of the highest quality which are made by hand and possess the sentiment of a human touch here in Shoop DEKO. Nothing makes our artists happier than smiles and gratitude of our beloved customers.
Our team specialise in handmade packaging for USB, DVD and all similar things for photography, wedding and events.
Ranging from small boxes and cases all the way to customized packaging, we strive to provide high quality products to you.
 We are always up for creating new products, so If you need something special please contact us on Etsy!

Enjoy!

Wood home decor by Holeybox

HOLEYBOX SHOP is the shop for people who are looking for something interesting and modern. Step right up and meet our divers team of creators. All of us in they respective area of trade- the people who make the unique and the exclusive happen on a daily basis.
 The idea of the shop is to charm the people with unique, one-of-a-kind, limited- edition, and hand-crafted products.
All of our products are made with the utmost care and love.
Materials- different Lithuanian wood (oak, pine, birch, asp, ash...)
 Have any offers, wishes, or simply cannot find what are you looking for? No problem! Send us a letter and we will try to help you with that. 

MeowForCatsShop know what cats would really loved to...

Here is MEOW SHOP and their story....
MEOW seeks everything the best of their beloved inspirers - cats.

Stands out for its unique design, comfortable for cats and ideal in your house corrugated cardboard furniture, scratching post and with love produced handmade toys. Peaces of which cat dreams are made of! 
MEOW - stuff which every self-loving cat would be proud of!
• UNIQUENESS OF SIMPLICITY: everyone knows about the almost instinctive love of all cats for corrugated cardboard. In the moment you open a carton box, no matter the size, cats immediately sits in it! MEOW - something more than simple cat trees...
 • NATURAL PRODUCT: meow furniture made of 100 % corrugated high quality and recycled cardboard. In scratching towers -wood also. Handmade in Lithuania! With the same goal as cat breeders, we have tried to put together all the best qualities and attributes for the best possible result. 
 • FUNCTIONALITY AND UNIQUE DESIGN: elegant furniture offers an ideal field for scratching and claw care. Variety of colors ant shapes. Mix that fits and finds place in every house and would be perfect for every cat.
• MOVEMENT AND FUN are very important aspect for maintaining the health of your cat. Discover the immense cat attraction of corrugated cardboard furniture and scratching tower. Cats just love them! 

Outstanding luxury in street wear! by PANDOwear

Really outstanding wear from PANDOwear SHOP. Have a look what perfect street wear they are creating... <3

Willingness to be different
Established in 2011, PANDO label became one of the most innovative Lithuanian premium class brands. Since the beginning, PANDO was synonymous with its tartan pants and quality denim products.
 Under a team of creative souls, including founding partner Marius Black, PANDO has evolved and it is rapidly growing each year. Brand’s designs offer a creatively different perspective to the mainstream, suggesting a thought-provoking, slightly twisted view of world. Taking inspiration from free spirits and merging this with premium street-wear staples PANDO creates a unique wardrobe for those who seek to affirm, express, fulfill and enjoy themselves through the company’s garments. 
 The common denominator for everything we do at PANDO is our undying passion for quality fabrics, innovative in-house design, functionality and skilled production. PANDO is a passionate traveler looking for new challenges. PANDO is a positive energy revolutionist.

____________PANDO wear_____________ 
 

DIY: Artist Teddy bear Hedgehog Free Step by step TUTORIAL by SoftlyBearPaw

This is my Teddy bear Hedgehog free tutorial which I would like to share with you. Teddy Hedgehog is 19cm tall while standing.
Happy sewing my friends ;) 
 
Material list

Hedgehog mohair 9mm pile – 20x20cm
Brown viscose 6mm pile – 25x22cm
Little piece of suedine for ears
6mm black glass eyes
6 x 15mm wooden discs for head and arms
4 x 20mm wooden discs for legs
10 x 12mm washers
5 T-shape cotter pins
Fiber fill for stuffing
Steel pellets for legs and tummy
Strong thread for sewing
Very strong eye yarn
Nose thread


Sewing Supplies
Little sharp scissors, Awl, Pins and needles, Cotter key and long nose pliers, Wooden stuffer, Fray stop, Oil paint and paintbrush for shading.

Bear Pattern
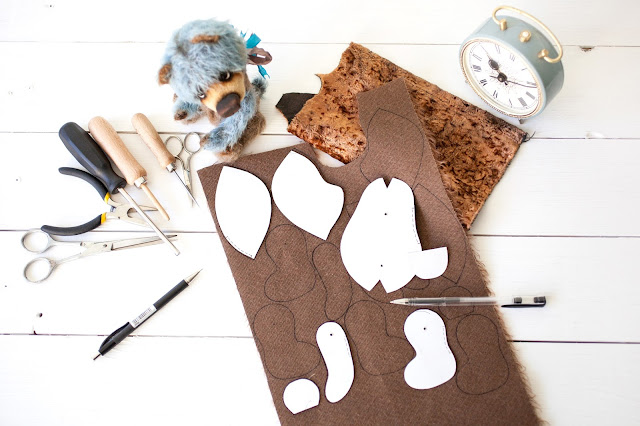
First of all you will need to transfer the pattern on heavy paper, and cut out all the details.  Mark all the signs that are shown on the pattern.
The arrow indicates the direction of the hair. The big dot shows the place where you will need to make a hole for joints. You also see a marked places where you must leave open place. Just make sure than you made a good knots in the end of seams and stain the open place with stir fray glue.
 
Transfer them to the wrong side of the fabric. It is most convenient to make it with a ballpoint pen. On light color fabrics I just use a pencil. Mark out all the pairs of items in mirror image. All my patterns are with 3mm seam allowance so you don’t need to add more. When working with patterns, pay special attention to all the marks! Transfer them all on the fabric.
Once the pieces all fit correctly onto the fabric then cut them out using a sharp scissors. I use embroidery scissors for cutting the pile. When cutting out fur (especially those with longer pile) insert the scissors under the fur when you cut.

Head
Start with the head and muzzle pieces. Place these pieces together with the furs together (inside out) and pin them. (You can never use too many pins!)When pieces are pined then sew them. Use back stitch to sew the pieces together. All seams are 3mm. 

After this you will have two head pieces. Now sew the arrow on each of the peace. After you have two finished peaces place them together with the furs together (inside out) and pin all around and sew. Don’t forget to leave hole for head joint.
Apply fray stop to the open area to prevent fraying during the stuffing.
Turn the hedgehog head to the right side out.  Stuff the head starting at the nose with small pieces of stuffing at a time. Use wooden stuffer.
Eyes
Place pins in the position you would like your eyes to be to test where the eyes should be inserted. Cut a long piece of eye thread. Pick one of the lengths, and thread both ends through the long doll needle, leaving a loop at the end. Insert the needle in the place where the ears should be, coming out through the hole of the opposite socket where the eye pin is inserted.  

mportant Note: leave thread loop hanging out of the ear – DO NOT PULL ALL THE WAY THROUGH.
Thread the needle through the wire loop of the eye and insert the needle back in the same hole. Come out almost next to where you started.
Wrap the needle 3 times through the synthetic sinew loop you’ve left behind and pull hard.
Insert needle next to where you first started and exit anywhere on the head.

Nose and mouth
Select a nose shape. Mark the shape onto the nose area and embroider it on using a satin stitch. Stitch the mouth on in the shape you desire.

Body
Sew the back part of the body piece and the front part of the body piece together to form the two sides of the body.
Place the two body pieces together and sew around, leaving the back open as indicated on the pattern.
Apply fray stop to the opening in the back to prevent fraying during stuffing.
Turn your body the right side out.

Arms and Legs
As my hedgehog pattern arms are without paws. Just put the arms pieces rights sides together and sew around the edges leaving and open space as shown in the pattern. And repeat this with the legs. Apply fray stop to the opening to prevent fraying during stuffing.

Ears
Sew around the ears leaving an open space where indicated on the pattern. Turn the right way around. Sew the ear closed using a ladder stitch. Pin the ears in place. Attach to the head using a ladder stitch.

Jointing the limbs
Thread a washer and a disc onto a cotter pin. Put the cotter pin/washer/disc set into the hole (use an awl to make a hole) in your limb and push the cotter pin through the marked joint hole and then into the corresponding hole in the body. Add the disc and another washer and with the help of a long nose pliers or a cotter pin turner, turn each cotter pin's leg away from each other and tighten it very well. Perform the steps for the other limbs.

Jointing the head
Thread a washer and a disc onto a cotter pin. Put the cotter pin/washer/disc set into the hole in hedgehogs head. Use a leader stitch to close the head hole.
Push the cotter pin through the chosen joint hole in the body. Add the disc and another washer and with the help of a long nose pliers or a cotter pin turner, turn each cotter pin's leg away from each other and tighten it very well.
 Stuffing
Use small pieces of fiber fill stuffing and stuff the arm from the paw pad first. Stuff firmly and fill it well. Use a stuffing tool to do so. Turn the raw edges of your opening inwards and ladder stitch the hole closed. Each stitch should be pulled tightly and the seam will close. Tie off with a knot and cut the thread. Do not over stuff the area where the ladder stitching will be sewn as this is a stressed area and stitches may not pull correctly together. Don’t forget to add steel pellets in to the feet about one tea spoon. And then stuff the legs in the same manner as the arms (mentioned above). Instead of making toes on arms and legs I just use nose thread and simple stitch to mark the nails.

Stuffing the body
Using small bits of stuffing at a time, stuff the body firmly. Don’t forget to add steel pellets at first. Make sure that the bum and tummy are stuffed well. Turn in the raw edges at the opening on the back and ladder stitch it closed.

Shading
Carefully shade the nail lines and tummy, areas above eyes and around the muzzle with a dark brown oil paint.
Extract small amount of paint on some paper and leave an hour to drain off the oil. Then soak brush in to the paint swept it into piece of some material and line material until you see the brush dye very pale then start to tone bear. But I recommend trying it on the peace of fur at first.

Accessories

The accessories are of your choice J I like to use natural silk ribbon dyed with silk paint in the color I want.

I hope you like this tutorial and Have a very fun time making your own Hedgehog...
You can find more Teddy bear PDF patterns in my SHOP

Best wishes, Simona

Handmade slippers and boots by JurgaFeltLife

My life as a felt-maker began when I became a mom" saying Jurgita. Here is her SHOP and all the story.

I fell in love with felt in 2008 when my first son turned 3 months old. The love grew bigger and bigger with every little thing I used to felt, with every piece of art I found in books and magazines. Before that I worked as an architect in a small company, later I understood I really need more freedom in my occupation, I wanted to see my children growing. I wanted to do what I really loved to. This was working with textile. This was felting.
My very first felt craft was a pair of red slippers for myself: much better than I could have imagined. Afterwards there was a bag with flying little butterflies, slippers for my family and handbags for friends. Step by step I discovered more and more about this old and amazing craft.
We live near a forest and a lake surrounded by wild meadows in summer and magnificent snowdrifts in wintertime with only a few neighbours in the distance.
I work at home. In the midst of beautiful nature I feel so free and creative. I can't imagine myself working alone. Kids, my little assistants, are running around and are always willing to advise me on the selection of colours. My husband is also there with his free sense of art and brilliant ideas. He is my number one quality controller. I love working at home where I can feel free and comfortable.

So this is my life. This is my shop story.

Something interesting about Amber and how it's made...

This story was shared by Aiste and her blogg Drop of Amber where you can find more interesting information about amber ;).

I hope most of my readers realize that amber is not really "made" as such. It has been around for hundreds of millions of years and is a product of a long process.
Amber is fossilized tree resin (not sap). Hundreds of millions of years ago huge coniferous forests covered big parts of what is today Baltic sea and its environs. Resin from these trees (in our region its Pinus succinifera and similar trees) seeped down sometimes trapping insects or other organic matter (this way forming so called inclusions) and then solidified. Geological changes caused parts of the forest to be buried under the ground or later even water and the process began.
 Molecular polymerization, resulting from high pressures and temperatures produced by overlying sediment, transformed the resin first into copal. Sustained heat and pressure drove off terpenes and resulted in the formation of amber.
There are several conditions which had to be present in order for resin to become amber.

The starting resin had to be resistant to decay. Many trees produce resin, but in the majority of cases this deposit is broken down by physical and biological processes. Exposure to sunlight, rain, and temperature extremes tends to disintegrate resin, and the process is assisted by micro-organisms such as bacteria and fungi. For resin to survive long enough to become amber, it had to be resistant to such forces or be produced under conditions that exclude them.
Other kinds of amber came to be in a similar way, only the resin came from different trees, thus resulting in a different chemical composition.
 This is the reason why only Baltic amber is considered to have medicinal properties due to one of its components -- succinic acid. Teething necklaces and bracelets (only made from untreated Baltic amber) are used for this reason as well. If you are choosing a teething necklace for your child -- be careful, a lot of amber that is nicely transparent (especially bigger sized beads, uniform in shape) is usually heat treated amber -- it is boiled in hot oil to become transparent. But unfortunately during this procedure it loses most of its succinic acid, which is the healing bit of amber.


Textile jewelry and silk accessories by AudraTextileStudio

Here is AudraTextileStudio and her SHOP
We think her works tell much more about her than any text could. And here is the story...

Every day we choose the way for our journey. Happy day is when we find a place we love to be. I found :)
Impressions from places you have ever been, the peoples you met long ago or one day before all these things what happens with us are a part of what we are doing now.

Love twisting my small circles, creating patterns and constructing to form which looks like big clouds :)) 
Love the feeling of floating dyes on the silky surface, love the colors game when two colors creates their own shadows. That is my silk paintings :)

And love your messages how happy and delightful you are :))

Teikia „Blogger“.

Popular Posts

Like us on Facebook

Follow Us on Instagram